We'll cut the background from an image in Gimp and also we will make a transparent background.
1. Click File than Open or (CTRL and O).
1. Click File than Open or (CTRL and O).
2. Navigate to the image you want and press Open button.
Volkswagen Golf VI of Serbian Border Police and Serbian police force
Image by Boris Dimitrov Via Wikimedia Commons
This image is neither created nor endorsed by Boris Dimitrov in any way. Boris Dimitrov do not endorse me and/or my use of the work in any way.
2b. From top bar click File, then Save As (Shift+CTRL+S), to save your file. Type the name of the file and click the Save button.
3. Select Paths Tool. Edit Mode: Design.
4. You can make picture bigger if you want, so you cut it easier. My image was at 25%, and now is 50%.
5. Start going around the area you wish to cut, by making dots.
6. If you make mistake, like on the picture below, you can use (CTRL+Z) to go back.
7. To close the selection you need to place empty dot on first white dot, you made on the beginning. Also you need to place empty square (right handle, assuming that you started from left to right to cut picture).
8. Right click on the image within the selection, from dropdown menu choose Select and then From Path (Shift+V), to replace selection with path.
8b. To have transparent background (just car), right-click on layer you are using and from drop down menu click on Add Alpha Channel.
Updated: 12/06/2020
9. To invert selection, from top bar click Select then Invert (CTRL+I).
10. From top bar click Edit then Clear, or you can press Delete button on keyboard, to remove background.
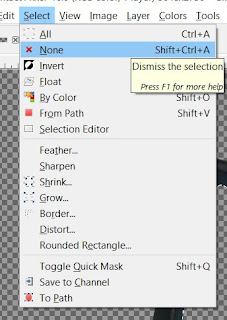
11. To remove the selection from top bar click Select and then None (Shift+CTRL+A).
12. Now, if you want different background color, you can select Bucket Fill Tool (Shift+B). From the color wheel select the color you want and click on the white background.
12b. From top bar click File then Export As (Shift+CTRL+E) to save image as jpg. Be sure that your extension is .jpg.
To make a transparent background
13. After the step 9. is done, we will add transparency to the layer, by selecting from top bar Layer, then from dropdown menu click Transparency and click Add Alpha Channel.
Note: I accidentally clicked History dialog and forgot about it; you should be on Layers dialog :)
14. From top bar click Edit then Clear, or you can press Delete button on keyboard, to remove background.
15. To remove the selection from top bar click Select and then None (Shift+CTRL+A).
16. From top bar click File then Export As (Shift+CTRL+E) to save image as png. Be sure that your extension is .png.
To cut the rest of the background from the image
17. We will use Free Select Tool.
18. Start going around the area you wish to cut, by making dots.
19. To close the selection click the first dot.
20. From top bar click Edit then Clear, or you can press Delete button on keyboard, to remove background.
21. To remove the selection from top bar click Select and then None (Shift+CTRL+A).
Repeat steps from 17 to 21 to cut unwanted background.
23. Ta daaaa :)


No comments:
Post a Comment
Note: Only a member of this blog may post a comment.