
1. Pokrenite XAMPP. Pokrenite Apache i MySQL klikom na Start dugme.

2. Otvorite phpMyAdmin, kliknite na Admin u liniji MySQL-a ili ukucajte u address bar http://localhost/phpmyadmin/.
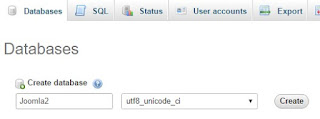
3. Kliknite na karticu Databases, u prvo polje upisite ime baze podataka, u ovom primeru, joomla2, a u drugo polje odaberite odgovarajuci Collation, u ovom primeru, utf8_unicode_ci, pa klik na dugme Create.


4. Idite u htdocs folder XAMPP-a. C:/xampp/htdocs i napravite folder sa imenom vase baze podataka, u ovom primeru, Joomla2.

5. Skinite zeljenu verziju Joomle sa https://downloads.joomla.org/.

6. Raspakujte.


7. Otvorite raspakovani folder, u ovom primeru, Joomla_3.6.4-Stable-Full_Package. Kopirajte sav sadrzaj i prekopirajte u Joomla2 folder (iz koraka 4.).


8. U address bar ukucajte ime local hosta i ime baze podataka, localhost/Joomla2 i pritisnite Enter. Otvorice se strana za instalaciju.

9. Korak 1 - konfiguracija. Polja oznacena sa zvezdicom (*) su obavezna.
a) Izaberite jezik iz padajuceg menija.
b) U polje Site Name* - unesite ime vaseg Joomla web sajta.
c) U polje Description - unesite generalni opis celog vaseg web sajta, koji koriste pretrazivaci (maksimum 20 reci).
d) Site Offline - postavite izlog web sajta u nekativan status kada se instalacija zavrsi. Kasnije mozete postaviti web sajt u aktivan status preko Globalne Konfiguracije.
e) Administrator Email* - unesite ispravnu email adresu koju cete koristiti za vas web sajt. To ce biti email adresa Super Korisnika web sajta.
f) Administrator Username* - unesite korisnicko ime za racun vaseg Super Korisnika. U ovom primeru, joomla2016.
g) Administrator Password* - unesite lozinku za racun vaseg Super Korisnika.
h) Confirm Administrator Password* - potvrdite lozinku.

Kliknite na dugme Next.
10. Korak 2 - baza podataka.
Kreiranje korisnika i lozinke za bazu podataka u phpmyadmin.
10.1. Otvorite phpMyAdmin, kliknite na Admin u liniji MySQL-a ili ukucajte u address bar http://localhost/phpmyadmin/.
10.2. Kliknite na karticu User accounts.

10.3 Ispod tabele korisnickih racuna, kliknite na link Add user account.

10.4. Odeljak - Login Informacije (informacije za prijavu na racun).
U polje User name - ako vec nije izabrano, iz padajuceg menija izaberite Use text field. U polje unesite korisnicko ime, u ovom primeru joomla2user.
U polje Host Name - iz padajuceg menija izaberite Local.
U polje Password - ako vec nije izabrano, iz padajuceg menija izaberite Use text field. U polje unesite vasu lozinku.
U polje Re-type - potvrdite vasu lozinku.
ili
Polje Password ostavite prazno, ali kliknite na dugme Generate, da vam se napravi lozinka. Zatim je kopirajte i prekopirajte u polje Password. A onda potvrdite lozinku u narednom polju.
Authentication Plugin - ostavite kako jeste - Native MySQL Authentication.

Odeljak - Globalne Privilegije
Cekirajte polje Check All.

Kliknite na dugme Go.
Dodali ste novog korisnika.

Polja oznacena sa zvezdicom (*) su obavezna
a) Database Type* - izaberite bazu podataka iz padajuceg menija. U ovom primeru, MySQLi.
b) Host Name* - unesite ime hosta. Uglavnom je localhost ili ime koje ste dobili od hosting kompanije.
c) Username* - unesite korisnicko ime koje ste napravili ili koje ste dobili od hosting kompanije. U ovom primeru, joomla2user.
d) Password - unesite lozinku koju ste napravili sami ili napravili preko dugmeta Generate. Za bezbednost vaseg web sajta upotreba lozinke za bazu podataka je obavezna.
e) Database Name* - unesite ime baze podataka vaseg Joomla web sajta, koju ste napravili u koraku 3, u ovom primeru je Joomla2.
f) Table Prefix* - napravite prefiks tabele ili neka ga nasumicno generise. Idealna duzine je 4 ili 5 karaktera, moze sadrzati alfanumericke (slova i brojeve od 0 do 9) karaktere i MORA da se zavrsi sa donjom crtom _ . Uverite se da prefiks koji ste izabrali ne koriste neke druge tabele.
g) Old Database Process* - Dugme "Napravite kopiju" i dugme "Uklonite" - bilo koje postojece tabele od prethodnih Joomla instalacija sa istim prefiskom tabela. U ovom primeru, "Backup".

Kliknite na dugme Next.
Opcionalno - otvorite tekst dokument, sacuvajte ga, a u njega upisite:
verzija: JOOMLA 3.6.4.
11. Korak 3 - pregled.
Zavrsetak
Install Sample Data - instalirati uzorak podataka:
a) None - Nista (ako pravite visejezicni web sajt).
b) Blog English (GB) Sample Data - Instalirati Joomlu sa nekoliko clanaka i modula vezanih za blog kao sto su Stariji Clanci, Blog Roll, Najcitaniji Clanci.
c) Brochure English (GB) Sample Data - INstalirati Joomlu sa nekoliko stranica (navigacioni meni sa stranicama Pocetna, O nama, Vesti, Kontakt) i modulima kao sto su Pretraga, Forma za prijavu (login).
d) Default English (GB) Sample Data - Instalirati Joomlu sa jednom stranicom (navigacioni meni sa jednim linkom) i moduli kao sto su Najnoviji Clanici, Forma za prijavu (login).
e) Learn Joomla English (GB) Sample Data - Instalirati Joomla sa primerima clanaka koji opisuju kako Joomla radi.
Izaberite jednu opciju. U ovom primeru a)

Pregled
Poslati Konfiguraciju na Email - Ako odaberete Yes, na email adresu iz koraka 9. e) bice vam poslata podesavanja konfiguracije, nakon instalacije Joomle. U ovom primeru No.

Ukljuciti Lozinke u Email - Odaberite No. Upozorenje! Nije preporuceno da saljete i cuvate vase lozinke u email-u.

Glavna Konfiguracija
Postavke iz koraka 9. Korak 1 - konfiguracija.
Konfiguracija Baze Podataka
Postavke iz koraka 10. Korak 2 - baza podataka.
Provera Pre-Instalacije
Ako neke od ovih stavki nisu podrzane (oznacene sa crveno No), preduzmite akcije da ih ispravite
. Ne mozete da instalirate Joomlu, dok vase podesavanje ne ispuni uslove koji su navedeni dole.
Preporucena Podesavanja
Ova podesavanja su preporucena za PHP kako bi se osigurala puna kompatibilnost sa Joomlom. Medjutim, Joomla ce i dalje raditi ako postavke sasvim ne odgovaraju preporucenoj konfiguraciji.

Kliknite na dugme Install.
Tadaaa :)

12. Ako ste u koraku 11. izabrali opciju a), mozete instalirati dodatne jezike za vas web sajt.
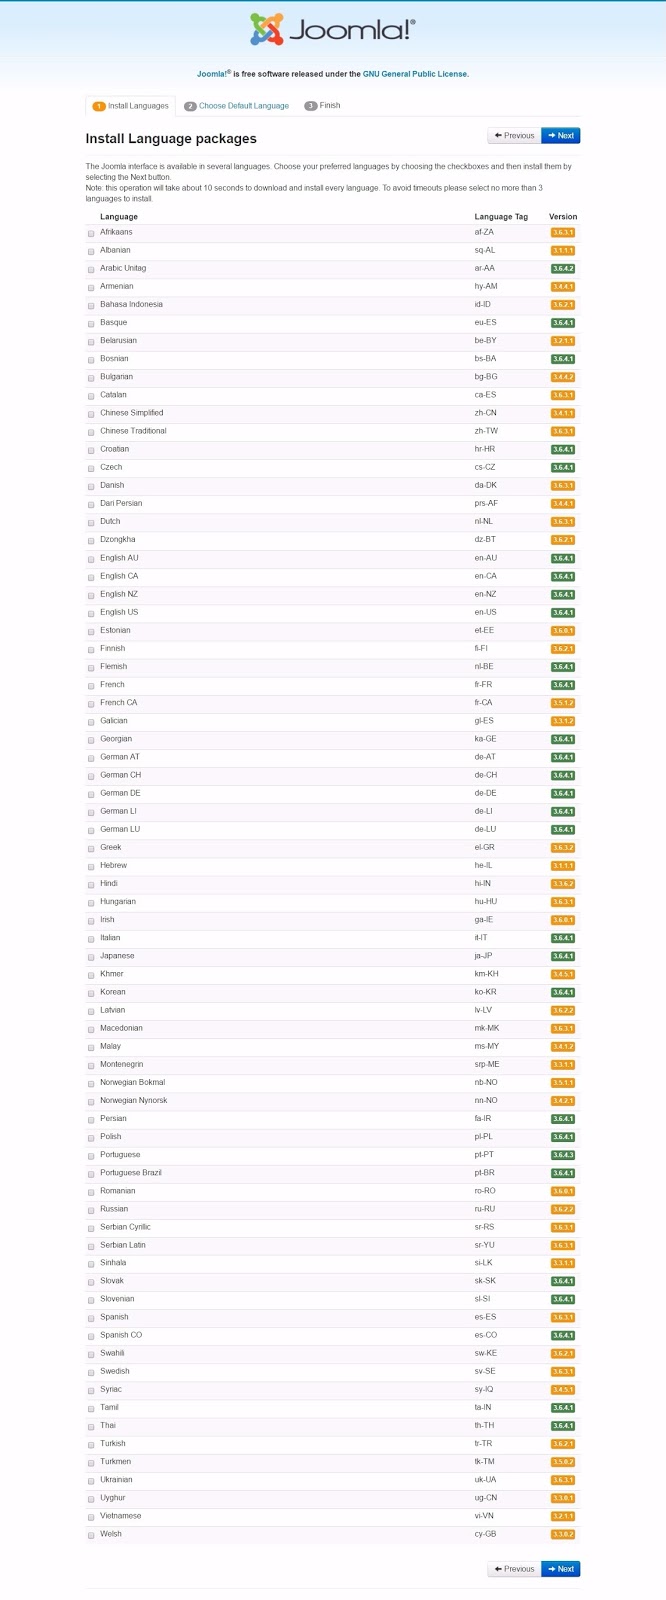
Kartica Instalirati jezike
12.1. Izaberite do 3 jezika koje zelite da budu na vasem Joomla web sajtu. Preporuka je da budu do 3 jezika da ne bi doslo do "zagusenja" prilikom instalacije jezika.

Kartica Izaberite Standardni Jezik
12.2. a) Visejezicnost
Ova sekcija dozvoljava vam da automatski aktivirate visejezicnost Joomle.
Aktivirati visejezicnost - Yes. Ako je aktivno vas Joomla web sajt ce imati aktiviranu opciju visejezicnost sa lokalizovabin navigacionim menijima za svaki instaliran jezik.
Instalirati lokalizovan sadrzaj - Yes. Ako je aktivno, Joomla ce automatski napraviti jednu kategoriju sadrzaja za svaki instaliran jezik. Takodje, istaknuti clanak koji sadrzi lazan sadrzaj ce biti napravljen za svaku kategoriju.
Omoguciti language code dodatak - Yes. Ako je omoguceno, language code dodatak ce dodati mogucnost za promenu koda jezika u generisanom HTML dokumentu za poboljsanje optimizacije za pretrazivace (SEO).

12.2. b) Standardni Jezik za Administratorski Panel
Izaberite standardni jezik za admin panel (ono sto posetioci ne vide).
12.2. c) Standardni Jezik za vas Web Sajt (Izlog)
Izaberite standardni jezik za Joomla izlog (ono sto posetioci vide).

Kliknite na dugme Next.

Kartica Kraj
Necete biti u mogucnosti da nastavite izvan ove tacke sve dok se ne ukloni instalacijski folder. To je sigurnosno svojstvo Joomle.
12.3. Uklonite instalacioni folder klikom na dugme Remove installation folder.
Instalacioni folder je uspesno uklonjen.

12.4. Otvorite vas web sajt (izlog) u novom prozoru. Zamemorisite stranicu.


12.5. Otvorite vas admin (prijava na vas web sajt) u novom prozoru. Zamemorisite stranicu.


Tadaaa 2 :)
1. Start XAMPP. Start Apache and MySQL by clicking the Start button.

2. Open phpMyAdmin, click Admin in the line of MySQL or type in the address bar http://localhost/phpmyadmin/.
3. Click the Databases tab, in the first field, enter the name of the database, in this example, joomla2, and in the second field, select the appropriate Collation, in this example, utf8_unicode_ci, and click on the Create button.

4. Go to htdocs folder of XAMPP. C:/xampp/htdocs and create a folder same as your database, in this example, Joomla2.

5. Download the desired version of Joomla from https://downloads.joomla.org/.

6. Unzip.


7. Open the unziped folder, in this example, Joomla_3.6.4-beta-Full_Package. Copy all content and paste in Joomla2 folder (from step 4).


8. In the address bar, type the name of the local host and database name, localhost/Joomla2 and press Enter. The page for installation will be open.

9. Step 1 - configuration. Fields marked with an asterisk (*) are required.
a) Choose a language from the drop-down menu.
b) In the field Site Name* - enter the name of your Joomla website.
c) In the Description field - enter a general description of your entire website, which search engines will use (maximum 20 words).
d) Site Offline - Set frontend website in inactive status when installation is complete. Later, you can set up a website in an active status through the Global Configuration.
e) Administrator Email* - enter a valid email address you want to use for your website. This will be the email address of the Super User of the website.
f) Administrator Username* - enter the username for the account of your Super User. In this example, joomla2016.
g) Administrator Password* - enter the password for the account of your Super User.
h) Confirm Administrator Password* - confirm the password.

Click the button Next.
10. Step 2 - Database.
Creating user and password for the database in phpmyadmin
10.1. Open phpMyAdmin, click Admin in the line of MySQL or type in the address bar http://localhost/phpmyadmin/
10.2. Click the User accounts tab.

10.3. Under the tables of user accounts, click on the link Add user account.

10.4. Section - Login information (login information for the account).
In the field User name - if it is not already selected, from the drop-down menu, select Use text field. In the field, enter a user name, in this example joomla2user.
In the field Host Name - from the drop-down menu, select Local.
In the Password field - if not already selected, from the drop-down menu, select Use text field. In the field, enter your password.
In the field Re-type - confirm your password.
or
Leave Password field blank, but click Generate button, to generate a password. Then copy and paste in the Password field. And then confirm the password in the next field.
Authentication Plugin - leave it as it is - Native MySQL Authentication.

Section - Global Privileges
Check the box Check All.

Click the button Go.
You have added a new user.

Fields marked with an asterisk (*) are required.
a) Database Type* - select the database from the drop-down menu. In this example, MySQLi.
b) Host Name* - enter the host name. Usually is the localhost or the name given to you by the hosting company.
c) Username* - enter the username that you have made or provided by your hosting company. In this example, joomla2user.
d) Password - enter the password that you created yourself or made via the button Generate. For the security of your website using the password for the database is required (mandatory).
e) Database Name* - enter the name of the database of your Joomla website, you created in step 3, in this example, Joomla2.
f) Table Prefix* - make a table prefix or let it randomly generates. The ideal length is 4 or 5 characters, can contain alphanumeric (letters and numbers 0-9) characters and MUST end with an underscore _. Make sure that the prefix you choose is not in use by some other tables.
g) Old Database Process* - button "Backup" and "Remove" - any existing tables from previous Joomla installation with the same prefix table. In this example, "Backup".

Click the button Next.
Optional - open a text document, save it, and in it enter:
version: JOOMLAa 3.6.4.
For the database
---------------------
database-name: Joomla2 in step 10. e)
The next two options, if you created the user in phpMyAdmin.
username: your username (joomla2user) in step 10. c)
password: your password in step 10. d)
If you have not made a user.
username: root
Password: leave blank
For admin
------------
username: joomla2016 in step 9. f)
password: make a password in step 9. g)
email: your email in step 9. e)
CTRL+S to save a document. Copy and paste to USB or external hard drive.
11. Step 3 - overview.
Finalization
Install Sample Data - install the sample data for your Joomla website:
a) None - None (if you are making, multilingual website).
b) Blog English (GB) Sample Data - Install Joomla with a few articles and blog related modules like Older Posts, Blog Roll, Top Posts.
c) Brochure Englsih (GB) Sample Data - Install Joomla with a few pages (navigation menu with pages Home, About Us, News, Contact) and modules like Search, Login Form.
d) Default English (GB) Sample Data - Install Joomla with one page (navigation menu with one link) and modules such as the Recent Posts, Login Form. .
e) Learn Joomla English (GB) Sample Data - Install Joomla with example articles that describe how Joomla works.
Choose one option. In this example a)

Review
Email Configuration - If you select Yes, to the email address from step 9. e) configuration settings will be sent to you after installing Joomla. In this example No.

Include passwords in Email - Choose No. Warning! It is not recommended to send and store your passwords in the email.

Main Configuration
Items from step 9. Step 1 - configuration.
Database Configuration
Settings in step 10. Step 2 - Database.
Pre-Installation Check
If any of these items are not supported (marked with red No), take actions to correct them
. You can not install Joomla, until your setup meets the conditions listed below.
Recommended Settings
These settings are recommended for PHP in order to ensure full compatibility with Joomla. However, Joomla will still work if the settings do not quite match the recommended configuration.

Click on the Install button.
Tadaaa :)

12. If in Step 11. you chose option a), you can install additional languages on your website.
Install Languages tab
12.1. Choose up to 3 languages that you want to be on your Joomla website. It is recommended to be up to 3 languages in order not to come to "congestion" during installation of languages.

Choose Default Language tab
12.2. a) Multilingual
This section allows you to automatically activate Multilingual Joomla.
Actuate multilingual feature - Yes. If active Joomla website will have activated the option multilingual with localized navigation menus for each installed language.
Install localized content - Yes. If active, Joomla will automatically create one category of content for each installed language. And the featured article containing dummy content will be made for each category.
Enable the language code plugin - Yes. When enabled, language code plugin will add the ability to change the language code in the generated HTML document to improve search engine optimization (SEO).

12.2. b) Default Administrator Language (for Admin Panel - backend)
Select the default language for admin panel - backend (what visitors do not see).
12.2. c) Default Site Language (for your website - frontend)
Select the default language for the Joomla frontend (what visitors see).

Click the button Next.
Finish tab
You will not be able to proceed beyond this point until you remove the installation folder. This is a security feature of Joomla.
12.3. Remove the installation folder by clicking the button Remove installation folder.
Installation folder successfully removed.

12.4. Open your website (frontend) in a new window. Bookmark page.
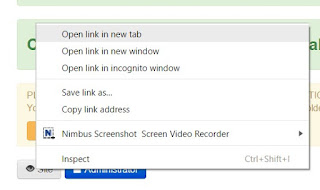

12.5. Open your admin (login to your website) in a new window. Bookmark page.


Tadaaa 2 :)

2. Otvorite phpMyAdmin, kliknite na Admin u liniji MySQL-a ili ukucajte u address bar http://localhost/phpmyadmin/.
3. Kliknite na karticu Databases, u prvo polje upisite ime baze podataka, u ovom primeru, joomla2, a u drugo polje odaberite odgovarajuci Collation, u ovom primeru, utf8_unicode_ci, pa klik na dugme Create.


4. Idite u htdocs folder XAMPP-a. C:/xampp/htdocs i napravite folder sa imenom vase baze podataka, u ovom primeru, Joomla2.

5. Skinite zeljenu verziju Joomle sa https://downloads.joomla.org/.

6. Raspakujte.

7. Otvorite raspakovani folder, u ovom primeru, Joomla_3.6.4-Stable-Full_Package. Kopirajte sav sadrzaj i prekopirajte u Joomla2 folder (iz koraka 4.).


8. U address bar ukucajte ime local hosta i ime baze podataka, localhost/Joomla2 i pritisnite Enter. Otvorice se strana za instalaciju.

9. Korak 1 - konfiguracija. Polja oznacena sa zvezdicom (*) su obavezna.
a) Izaberite jezik iz padajuceg menija.
b) U polje Site Name* - unesite ime vaseg Joomla web sajta.
c) U polje Description - unesite generalni opis celog vaseg web sajta, koji koriste pretrazivaci (maksimum 20 reci).
d) Site Offline - postavite izlog web sajta u nekativan status kada se instalacija zavrsi. Kasnije mozete postaviti web sajt u aktivan status preko Globalne Konfiguracije.
e) Administrator Email* - unesite ispravnu email adresu koju cete koristiti za vas web sajt. To ce biti email adresa Super Korisnika web sajta.
f) Administrator Username* - unesite korisnicko ime za racun vaseg Super Korisnika. U ovom primeru, joomla2016.
g) Administrator Password* - unesite lozinku za racun vaseg Super Korisnika.
h) Confirm Administrator Password* - potvrdite lozinku.

Kliknite na dugme Next.
10. Korak 2 - baza podataka.
Kreiranje korisnika i lozinke za bazu podataka u phpmyadmin.
10.1. Otvorite phpMyAdmin, kliknite na Admin u liniji MySQL-a ili ukucajte u address bar http://localhost/phpmyadmin/.
10.2. Kliknite na karticu User accounts.

10.3 Ispod tabele korisnickih racuna, kliknite na link Add user account.

10.4. Odeljak - Login Informacije (informacije za prijavu na racun).
U polje User name - ako vec nije izabrano, iz padajuceg menija izaberite Use text field. U polje unesite korisnicko ime, u ovom primeru joomla2user.
U polje Host Name - iz padajuceg menija izaberite Local.
U polje Password - ako vec nije izabrano, iz padajuceg menija izaberite Use text field. U polje unesite vasu lozinku.
U polje Re-type - potvrdite vasu lozinku.
ili
Polje Password ostavite prazno, ali kliknite na dugme Generate, da vam se napravi lozinka. Zatim je kopirajte i prekopirajte u polje Password. A onda potvrdite lozinku u narednom polju.
Authentication Plugin - ostavite kako jeste - Native MySQL Authentication.

Odeljak - Globalne Privilegije
Cekirajte polje Check All.

Kliknite na dugme Go.
Dodali ste novog korisnika.

Polja oznacena sa zvezdicom (*) su obavezna
a) Database Type* - izaberite bazu podataka iz padajuceg menija. U ovom primeru, MySQLi.
b) Host Name* - unesite ime hosta. Uglavnom je localhost ili ime koje ste dobili od hosting kompanije.
c) Username* - unesite korisnicko ime koje ste napravili ili koje ste dobili od hosting kompanije. U ovom primeru, joomla2user.
d) Password - unesite lozinku koju ste napravili sami ili napravili preko dugmeta Generate. Za bezbednost vaseg web sajta upotreba lozinke za bazu podataka je obavezna.
e) Database Name* - unesite ime baze podataka vaseg Joomla web sajta, koju ste napravili u koraku 3, u ovom primeru je Joomla2.
f) Table Prefix* - napravite prefiks tabele ili neka ga nasumicno generise. Idealna duzine je 4 ili 5 karaktera, moze sadrzati alfanumericke (slova i brojeve od 0 do 9) karaktere i MORA da se zavrsi sa donjom crtom _ . Uverite se da prefiks koji ste izabrali ne koriste neke druge tabele.
g) Old Database Process* - Dugme "Napravite kopiju" i dugme "Uklonite" - bilo koje postojece tabele od prethodnih Joomla instalacija sa istim prefiskom tabela. U ovom primeru, "Backup".

Kliknite na dugme Next.
Opcionalno - otvorite tekst dokument, sacuvajte ga, a u njega upisite:
verzija: JOOMLA 3.6.4.
Za bazu podataka
---------------------
ime-baze-podataka: Joomla2 iz koraka 10. e)
Sledece dve opcije, ako ste napravili korisnika u phpmyadmin-u.
korisnicko ime: vase korisnicko ime (joomla2user) iz koraka 10. c)
lozinka: vasa lozinka iz koraka 10. d)
Ako niste napravili korisnika.
korisnicko ime: root
lozinka: ostavite prazno
Za admin
------------
korisnicko ime: joomla2016 iz koraka 9. f)
lozinka: sastavite lozinku iz koraka 9. g)
email: vas email iz koraka 9. e)
CTRL i S da sacuvate dokument. Prekopirajte na USB ili eksterni hard disk.
11. Korak 3 - pregled.
Zavrsetak
Install Sample Data - instalirati uzorak podataka:
a) None - Nista (ako pravite visejezicni web sajt).
b) Blog English (GB) Sample Data - Instalirati Joomlu sa nekoliko clanaka i modula vezanih za blog kao sto su Stariji Clanci, Blog Roll, Najcitaniji Clanci.
c) Brochure English (GB) Sample Data - INstalirati Joomlu sa nekoliko stranica (navigacioni meni sa stranicama Pocetna, O nama, Vesti, Kontakt) i modulima kao sto su Pretraga, Forma za prijavu (login).
d) Default English (GB) Sample Data - Instalirati Joomlu sa jednom stranicom (navigacioni meni sa jednim linkom) i moduli kao sto su Najnoviji Clanici, Forma za prijavu (login).
e) Learn Joomla English (GB) Sample Data - Instalirati Joomla sa primerima clanaka koji opisuju kako Joomla radi.
Izaberite jednu opciju. U ovom primeru a)

Pregled
Poslati Konfiguraciju na Email - Ako odaberete Yes, na email adresu iz koraka 9. e) bice vam poslata podesavanja konfiguracije, nakon instalacije Joomle. U ovom primeru No.


Glavna Konfiguracija
Postavke iz koraka 9. Korak 1 - konfiguracija.
Konfiguracija Baze Podataka
Postavke iz koraka 10. Korak 2 - baza podataka.
Provera Pre-Instalacije
Ako neke od ovih stavki nisu podrzane (oznacene sa crveno No), preduzmite akcije da ih ispravite
. Ne mozete da instalirate Joomlu, dok vase podesavanje ne ispuni uslove koji su navedeni dole.
Preporucena Podesavanja
Ova podesavanja su preporucena za PHP kako bi se osigurala puna kompatibilnost sa Joomlom. Medjutim, Joomla ce i dalje raditi ako postavke sasvim ne odgovaraju preporucenoj konfiguraciji.

Kliknite na dugme Install.
Tadaaa :)

12. Ako ste u koraku 11. izabrali opciju a), mozete instalirati dodatne jezike za vas web sajt.
Kartica Instalirati jezike
12.1. Izaberite do 3 jezika koje zelite da budu na vasem Joomla web sajtu. Preporuka je da budu do 3 jezika da ne bi doslo do "zagusenja" prilikom instalacije jezika.
Kartica Izaberite Standardni Jezik
12.2. a) Visejezicnost
Ova sekcija dozvoljava vam da automatski aktivirate visejezicnost Joomle.
Aktivirati visejezicnost - Yes. Ako je aktivno vas Joomla web sajt ce imati aktiviranu opciju visejezicnost sa lokalizovabin navigacionim menijima za svaki instaliran jezik.
Instalirati lokalizovan sadrzaj - Yes. Ako je aktivno, Joomla ce automatski napraviti jednu kategoriju sadrzaja za svaki instaliran jezik. Takodje, istaknuti clanak koji sadrzi lazan sadrzaj ce biti napravljen za svaku kategoriju.
Omoguciti language code dodatak - Yes. Ako je omoguceno, language code dodatak ce dodati mogucnost za promenu koda jezika u generisanom HTML dokumentu za poboljsanje optimizacije za pretrazivace (SEO).

12.2. b) Standardni Jezik za Administratorski Panel
Izaberite standardni jezik za admin panel (ono sto posetioci ne vide).
12.2. c) Standardni Jezik za vas Web Sajt (Izlog)
Izaberite standardni jezik za Joomla izlog (ono sto posetioci vide).

Kliknite na dugme Next.

Kartica Kraj
Necete biti u mogucnosti da nastavite izvan ove tacke sve dok se ne ukloni instalacijski folder. To je sigurnosno svojstvo Joomle.
Instalacioni folder je uspesno uklonjen.

12.4. Otvorite vas web sajt (izlog) u novom prozoru. Zamemorisite stranicu.


12.5. Otvorite vas admin (prijava na vas web sajt) u novom prozoru. Zamemorisite stranicu.


Tadaaa 2 :)
1. Start XAMPP. Start Apache and MySQL by clicking the Start button.

2. Open phpMyAdmin, click Admin in the line of MySQL or type in the address bar http://localhost/phpmyadmin/.
3. Click the Databases tab, in the first field, enter the name of the database, in this example, joomla2, and in the second field, select the appropriate Collation, in this example, utf8_unicode_ci, and click on the Create button.


4. Go to htdocs folder of XAMPP. C:/xampp/htdocs and create a folder same as your database, in this example, Joomla2.

5. Download the desired version of Joomla from https://downloads.joomla.org/.

6. Unzip.

7. Open the unziped folder, in this example, Joomla_3.6.4-beta-Full_Package. Copy all content and paste in Joomla2 folder (from step 4).


8. In the address bar, type the name of the local host and database name, localhost/Joomla2 and press Enter. The page for installation will be open.

9. Step 1 - configuration. Fields marked with an asterisk (*) are required.
a) Choose a language from the drop-down menu.
b) In the field Site Name* - enter the name of your Joomla website.
c) In the Description field - enter a general description of your entire website, which search engines will use (maximum 20 words).
d) Site Offline - Set frontend website in inactive status when installation is complete. Later, you can set up a website in an active status through the Global Configuration.
e) Administrator Email* - enter a valid email address you want to use for your website. This will be the email address of the Super User of the website.
f) Administrator Username* - enter the username for the account of your Super User. In this example, joomla2016.
g) Administrator Password* - enter the password for the account of your Super User.
h) Confirm Administrator Password* - confirm the password.

Click the button Next.
10. Step 2 - Database.
Creating user and password for the database in phpmyadmin
10.1. Open phpMyAdmin, click Admin in the line of MySQL or type in the address bar http://localhost/phpmyadmin/
10.2. Click the User accounts tab.

10.3. Under the tables of user accounts, click on the link Add user account.

10.4. Section - Login information (login information for the account).
In the field User name - if it is not already selected, from the drop-down menu, select Use text field. In the field, enter a user name, in this example joomla2user.
In the field Host Name - from the drop-down menu, select Local.
In the Password field - if not already selected, from the drop-down menu, select Use text field. In the field, enter your password.
In the field Re-type - confirm your password.
or
Leave Password field blank, but click Generate button, to generate a password. Then copy and paste in the Password field. And then confirm the password in the next field.
Authentication Plugin - leave it as it is - Native MySQL Authentication.

Section - Global Privileges
Check the box Check All.

Click the button Go.
You have added a new user.

Fields marked with an asterisk (*) are required.
a) Database Type* - select the database from the drop-down menu. In this example, MySQLi.
b) Host Name* - enter the host name. Usually is the localhost or the name given to you by the hosting company.
c) Username* - enter the username that you have made or provided by your hosting company. In this example, joomla2user.
d) Password - enter the password that you created yourself or made via the button Generate. For the security of your website using the password for the database is required (mandatory).
e) Database Name* - enter the name of the database of your Joomla website, you created in step 3, in this example, Joomla2.
f) Table Prefix* - make a table prefix or let it randomly generates. The ideal length is 4 or 5 characters, can contain alphanumeric (letters and numbers 0-9) characters and MUST end with an underscore _. Make sure that the prefix you choose is not in use by some other tables.
g) Old Database Process* - button "Backup" and "Remove" - any existing tables from previous Joomla installation with the same prefix table. In this example, "Backup".

Click the button Next.
Optional - open a text document, save it, and in it enter:
version: JOOMLAa 3.6.4.
For the database
---------------------
database-name: Joomla2 in step 10. e)
The next two options, if you created the user in phpMyAdmin.
username: your username (joomla2user) in step 10. c)
password: your password in step 10. d)
If you have not made a user.
username: root
Password: leave blank
For admin
------------
username: joomla2016 in step 9. f)
password: make a password in step 9. g)
email: your email in step 9. e)
CTRL+S to save a document. Copy and paste to USB or external hard drive.
11. Step 3 - overview.
Finalization
Install Sample Data - install the sample data for your Joomla website:
a) None - None (if you are making, multilingual website).
b) Blog English (GB) Sample Data - Install Joomla with a few articles and blog related modules like Older Posts, Blog Roll, Top Posts.
c) Brochure Englsih (GB) Sample Data - Install Joomla with a few pages (navigation menu with pages Home, About Us, News, Contact) and modules like Search, Login Form.
d) Default English (GB) Sample Data - Install Joomla with one page (navigation menu with one link) and modules such as the Recent Posts, Login Form. .
e) Learn Joomla English (GB) Sample Data - Install Joomla with example articles that describe how Joomla works.
Choose one option. In this example a)

Review
Email Configuration - If you select Yes, to the email address from step 9. e) configuration settings will be sent to you after installing Joomla. In this example No.

Include passwords in Email - Choose No. Warning! It is not recommended to send and store your passwords in the email.

Main Configuration
Items from step 9. Step 1 - configuration.
Database Configuration
Settings in step 10. Step 2 - Database.
Pre-Installation Check
If any of these items are not supported (marked with red No), take actions to correct them
. You can not install Joomla, until your setup meets the conditions listed below.
Recommended Settings
These settings are recommended for PHP in order to ensure full compatibility with Joomla. However, Joomla will still work if the settings do not quite match the recommended configuration.

Click on the Install button.
Tadaaa :)

12. If in Step 11. you chose option a), you can install additional languages on your website.
Install Languages tab
12.1. Choose up to 3 languages that you want to be on your Joomla website. It is recommended to be up to 3 languages in order not to come to "congestion" during installation of languages.

Choose Default Language tab
12.2. a) Multilingual
This section allows you to automatically activate Multilingual Joomla.
Actuate multilingual feature - Yes. If active Joomla website will have activated the option multilingual with localized navigation menus for each installed language.
Install localized content - Yes. If active, Joomla will automatically create one category of content for each installed language. And the featured article containing dummy content will be made for each category.
Enable the language code plugin - Yes. When enabled, language code plugin will add the ability to change the language code in the generated HTML document to improve search engine optimization (SEO).

12.2. b) Default Administrator Language (for Admin Panel - backend)
Select the default language for admin panel - backend (what visitors do not see).
12.2. c) Default Site Language (for your website - frontend)
Select the default language for the Joomla frontend (what visitors see).

Click the button Next.
Finish tab
You will not be able to proceed beyond this point until you remove the installation folder. This is a security feature of Joomla.
12.3. Remove the installation folder by clicking the button Remove installation folder.
Installation folder successfully removed.

12.4. Open your website (frontend) in a new window. Bookmark page.


12.5. Open your admin (login to your website) in a new window. Bookmark page.


Tadaaa 2 :)

No comments:
Post a Comment