

1. Click File, than New or CTRL N.
2. In the Name field type the name of your file.

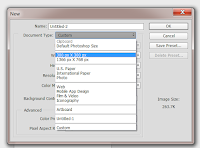
3. In the Document Type choose what type of document you want. If you choose "Custom" you can type the size you want. And if you, for example, choose "Web" you will get "Web Most Common" sizes.
Also, choose what measuring unit you want.
4. For Resolution, if you need the document for Web than type 72 Pixels/Inch or Pixels/Centimeter, depending what you have chosen for measuring unit and if you need it for Print than type 300 Pixels/Inch or Pixels/Centimeter.
5. For Color Mode I usually use default (RGB color, 8 bit).
6. For Background Content I usually use White, you can pick whatever you want :)
7. For Advanced options I'm leaving them as they are.
8. Saving Document - option 1: click OK button to save it.
Option 2: click Save Preset button.
In Preset Name type name and check what you want to include in your saved preset. I usually check all (actually I leave all that is checked).

Click on OK button. Again click on OK button, to close 2nd window.
Why are good presets?
If you want to reuse the document with same options.
How to open them once saved?
1. Click File, than New or CTRL N.
2. In Document Type field choose the one you want, in this example 300 px X 300 px.
3. In Name field type new name of your file.

4. Click OK button and taaaa daaaaa :)
How to delete saved preset?
1. Click File, than New or CTRL N.
2. In Document Type field choose the one you want to delete.
3. Click Delete Preset button and poooof it's gone :)
2. In the Name field type the name of your file.

3. In the Document Type choose what type of document you want. If you choose "Custom" you can type the size you want. And if you, for example, choose "Web" you will get "Web Most Common" sizes.
Also, choose what measuring unit you want.
4. For Resolution, if you need the document for Web than type 72 Pixels/Inch or Pixels/Centimeter, depending what you have chosen for measuring unit and if you need it for Print than type 300 Pixels/Inch or Pixels/Centimeter.
5. For Color Mode I usually use default (RGB color, 8 bit).
6. For Background Content I usually use White, you can pick whatever you want :)
7. For Advanced options I'm leaving them as they are.
8. Saving Document - option 1: click OK button to save it.
Option 2: click Save Preset button.
In Preset Name type name and check what you want to include in your saved preset. I usually check all (actually I leave all that is checked).

Click on OK button. Again click on OK button, to close 2nd window.
Why are good presets?
If you want to reuse the document with same options.
How to open them once saved?
1. Click File, than New or CTRL N.
2. In Document Type field choose the one you want, in this example 300 px X 300 px.

3. In Name field type new name of your file.

4. Click OK button and taaaa daaaaa :)
How to delete saved preset?
1. Click File, than New or CTRL N.
2. In Document Type field choose the one you want to delete.
3. Click Delete Preset button and poooof it's gone :)
No comments:
Post a Comment
Note: Only a member of this blog may post a comment.